As a project manager for design and creative teams, juggling multiple tasks, staying on top of campaign deadlines and, keeping your team's creative vision on track can seem like a Sisyphean challenge. Maintaining organization and communication is essential, but it doesn't have to be overwhelming. We're here to provide first-hand insights and tips on mastering the art of creative project management.
We are going to explore the world of design project management, uncovering the secrets to a smooth creative workflow and constructive communication between teams. We'll delve into essential tools, techniques, and best practices to help you streamline your projects and keep everyone on the same page. By the end of this creative project management journey, you'll be equipped with the knowledge to handle even the most complex design projects with ease.
What we'll cover
Table of contents
With design projects –where ideas and interpretations are subjective– there’ll likely be a higher number of revisions and edits needed. You’ll need to properly allocate resources, define timeframes, and have a good approval system in place to make things work. That’s where design project management comes in.
Proper design project management lets you hone in on the goals of the project, balance tasks across your team more effectively, and keep everyone focused and organized on achieving the goals. You also get to make provisions to manage risks and unexpected events which is key to delivering great work on time, every time!
With solid design project management, you can remove ambiguity over the scope of the project, and save yourself unnecessary reworks right from the start.

What is Design Project Management?
Design project management is the way you plan, organize, and manage the time, people, and other resources needed to complete a design project in a timely manner.
Good design project management means that you’re paying attention to:
- The scope of the project.
- The amount of time and costs involved.
- The people involved i.e. your team and your client.
- The review and approval process.
- The potential compliance risks.
Whether that project is redesigning a website, creating a logo, or producing other brand assets for a company, with every design project, the purpose of project management is to use the least resources possible to create effective designs that achieve the project and client goals.
How to Successfully Manage Design Projects (15 Steps)
The key to effective design project management is figuring out a system for organizing the collaboration process efficiently. You need to set up a process that caters to your client’s requirements e.g deadlines, without limiting your team’s creativity.
Here are the 15 steps we recommend you follow.
1. Understand the business requirements
Understanding and documenting your client’s business requirements is the foundational step to project success. Without knowing what the vision is and what problems need to be solved, it’s easy to get carried away with form over function.
Gather every bit of information the client can provide about what they want, but also ask questions that drill into why they really want or need it.
“What are your goals?”
“What are your priorities?”
“What are the pain points?”
Asking good questions will help you understand what they want and even help clients explore new possibilities too.
2. Set clear expectations with the client
You are the link between the client and your team, so it’s your responsibility to relay exactly what they expect to your team. But clients aren’t always great at expressing their needs.
To avoid scope creep, take the time to get clear on the expectations before you get started. What is expected from you and your team? What is the process going to look like?
Set expectations early and often with pre-kickoff meetings; one with your team and one with the client at the beginning of the project. Some things you may want to discuss:
- Scope
- Timeline
- Project requirements and documents
- Communication methods etc.
3. Outline goals, team, and budget
Outlined goals help keep everyone focused on what you are set to achieve. You should have three types of goals outlined:
- Performance goal - the desired outcome.
- Time goal - an agreed end date.
- Resource goal - the budget or amount of resources you need to use.
From here you can lay down the strategy for execution.
What needs to be done, when, and how it needs to be done. What skill level is needed to achieve it, what resource is needed, and which team member needs to handle what.
Are all these figures (time frame, budget) realistic? Do you have enough room to maneuver in case anything doesn’t go to plan? Is the data you have complete and consistent? This is the phase where you answer these questions.
4. Collect design assets
This stage isn’t just important for having the design phase of a project organized, collecting assets is a great way to uncover project scope you may not have discussed initially. That’s why it needs to be done earlier.
Collect logos, fonts, colors, and hex codes, just about anything that will help with the design process.
Tip! Use intake forms – web accessible forms that allow you to share files with external collaborators without the need for email– to make your life easier.
In the collection process, intake forms can be the difference between a stress-free kickoff and wasting time and energy juggling different submission formats across different communication channels.
Without intake forms, you are likely to experience delays as you spend time coordinating requests and routing files to the right people. Then there’s the risk of losing time while waiting for people to check their emails before they take action. That’s why it’s smart to set up a collection process with intake forms before you start the project.
5. Define your design process
Before you can start working on designs, you first need to have a repeatable process to work through.
A typical collaborative design process will look something like this:

This is a key step towards improved design quality and consistency. Having this laid down will help you define the who, what, when, and next steps of every phase in the design project.
For example: in the project prototyping step, your design process will reveal that the designer/s (who) is responsible for creating the design (what), after initial research (when), and this design will be created after a review (next step).
Don’t forget to outline the tools and communication channels to be used at each stage of your design process too!
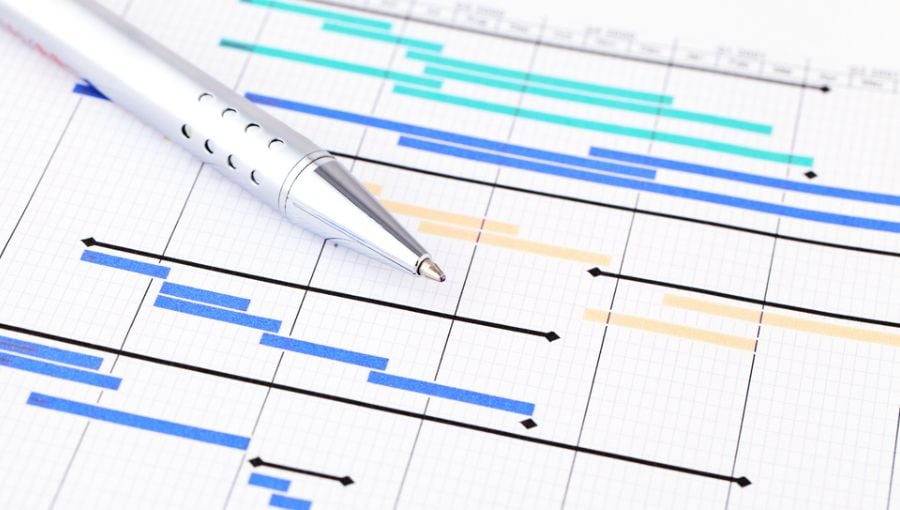
6. Create a clear project timeline
Design projects can get messy if you don’t break things down into smaller timelines. You run the risk of letting your team spend too much time in one phase of the project only to realize that there isn’t enough time to complete everything at the dying minute.
What a project timeline helps you do is allocate time and resources to each phase as needed, keep everyone in the loop, track progress, and keep implementation on schedule.
Here are some steps to create an effective project timeline:
- Split the design project into smaller milestones
- Further, split each milestone into bite-sized tasks
- Define task priorities for dependent tasks
- Assign time frames to tasks
With a clear timeline in place, you make it less likely to miss the deadline or deliver subpar work.
7. Develop a formal design brief
If you want to save time and money on your project, a design brief is a must.
A design brief is a one or two-page document (most times) that explains the plan of action for a design project. It’s the outline of the goals and the map that gets you there.
For example, here’s what Reebok’s brief for a print campaign looks like:

A well-written design brief will lay out the client's budget, preferences, and expectations for the project. The main focus will be on what outcomes and results the design is expected to achieve for the client’s business. This is key to providing the background and insights the designers need to do a great job with fewer reworks.
8. Outline a contingency plan
Things don’t always go as planned with design projects. Unfortunately, it’s those unexpected things that often define what happens with a project unless you proactively plan for them. There should always be a backup plan to quickly and adequately respond to issues as soon as they arise.
A few places to anticipate risks include:
- Your team - Prepare for people to sometimes lack the skills needed to complete a project or experience family emergencies that mean they need some time off.
- The timeline - Any delays in schedule can pose a risk to final delivery. Leave room for delays throughout the timelines.
- The project scope - Even if you do everything right, sometimes clients can still leave essential info out and put you at risk for scope creep. Ask for client expectations often but also leave room for change.
- Funding - Think about what you need to do if costs are underestimated, or if funds dry up halfway through!
Once you have this addressed in your project management plan, you’ll have a plan of attack ready for when they strike.
9. Assign tasks
Here’s the unspoken rule of completing team projects on time; If you want to get something done, make sure there’s a particular person directly responsible for it.
Delegate project duties according to the strengths and weaknesses of each team member. The good thing about doing this is that you get to see exactly how the workload is spread so you aren’t depending on one person to get the majority of the project done.
And If you are using creative project management software to manage your project, the work assignment feature allows you to assign work to the best-suited person right within the system for everyone to see.
10. Establish communication channels
Successful collaboration has a lot to do with open communication. There are so many individuals in many different phases that may expect different communication methods. It's best to establish what communication channels you'll be using throughout the design process. Will you use email, create a slack channel or will you use video conferencing to communicate?
Whatever channels you choose, communication should be agreed on so everyone knows what to expect and what platform to check the most.
11. Schedule daily standups
Daily standups are short team meetings –up to 15 minutes. They are important for many reasons.
- To ensure people have all the resources they need to meet deliverables and don't have any roadblocks.
- Allow your team members to get feedback when it’s needed.
- Provide a chance to review progress and measure productivity.
- Keep team members motivated to complete a project.
Simply put, daily standups are an opportunity to understand how you're doing and to make the necessary changes to succeed with the project together as a team.
12. Produce initial design concepts
Once you’ve got the design brief and are clear on how you want the project to go, the next step is to produce initial design concepts; storyboards, drawings for review.
First, perform your research. You can look at the design brief to figure out the design objectives that are most important, then brainstorm ideas that help communicate them with your entire team, not just the designers. The worst thing is to get approval for a design that your team cannot implement.
Once you have everyone brainstorming together, you can work on creating something out of overarching patterns and concepts.
13. Finalize design direction
Now it’s time to hone in on one or two of the initial concepts from the previous step. Ideally, the client will share what their favorite elements are from each concept. Things like the preferred font and favorite color scheme should be confirmed. These insights will help you create a great final product.
Also, consider the direction that best represents the goal. Will those concepts inspire the expected action from the client’s target audience? Your focus when deciding on design direction should be what the design is supposed to achieve, not how it looks or how creative it is.
14. Review and approve designs
This stage involves not just gathering client feedback, but an internal review and approval process too.
Does the design still align with the client’s goal? Can your team spot any flaws in the design? Are there potential compliance issues?
Getting internal feedback before sending it off to the client should help fast-track the final approval process.
Between the review and revisions, you’ll need to create a smart system that lets you:
- Share content internally.
- Gather client feedback.
- Track feedback
- Compare versions
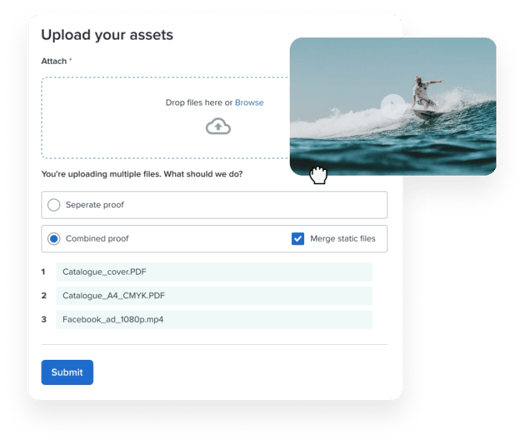
That’s where a reliable online proofing system comes in.
For example, Ziflow can help streamline the entire review and approval process across 1,200+ different media types:
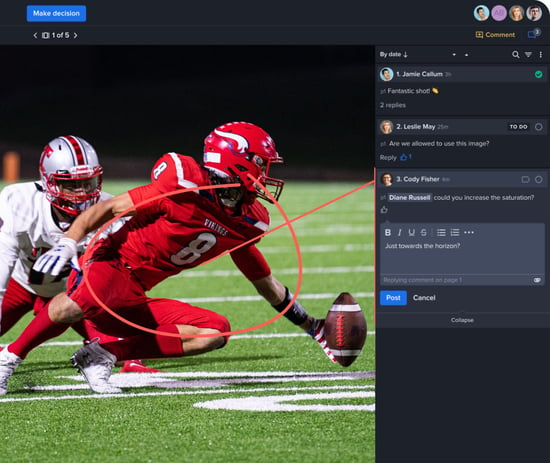
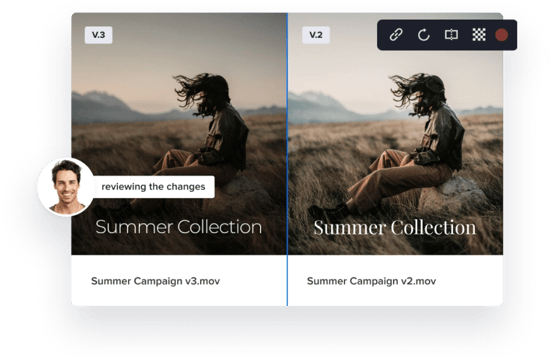
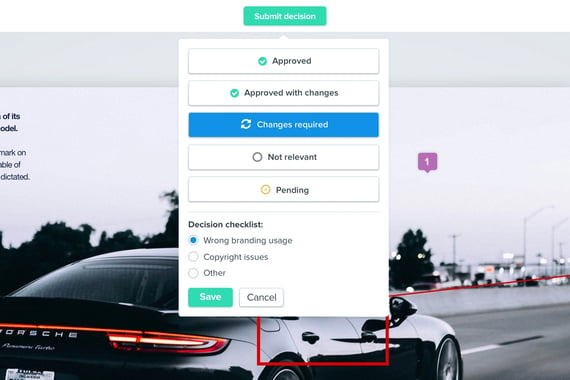
Users can compare design proofs side-by-side, add annotations, leave comments, securely share with other stakeholders, and keep an audit trail for compliance:
An online proofing tool like Ziflow will also allow you to quickly organize and retrieve design files by organizing assets into filterable folders:

You can also automate creative workflows that usually take up a lot of your team’s time, and in the process free up more resources for actual design work:

These features allow teams to deliver design projects faster, while helping to ensure quality and compliance. In fact, the average company using Ziflow only requires two design versions per project, which is over 50% less than industry average.
15. Get final sign off
Once the project is internally reviewed and approved, it’s time to get the final sign-off from the client. On average, it should take one to three revisions to finalize a design project.
But sometimes you may find the client requesting changes again after the design has been approved. That’s why it’s best to use a system that locks in approvals so a client cannot just up and change their mind about a previously approved design.
Integrations to Better Manage Design Projects
At Ziflow, our goal is to make it easy for all creative teams to collaborate and deliver quality creative, faster.
That’s why we offer integrations with some of the most popular creative project management tools like monday.com and Asana.
For example, with our monday.com integration, you can:
- Notify a project team when a new proof is ready for review, complete with a link to the proof.
- Update monday.com timelines as new proofs make their way through stages in Ziflow.
- Easily assign team members proof-review tasks in monday.com when a new review stage is triggered in Ziflow.
- Update numbers columns to countdown project due dates based on proof trigger events in Ziflow.
- Send decisions made in Ziflow to monday.com to update the Status column for a board or pulse, in real-time.
With our Asana integration, you can:
- Create a new project or task(s) within a project, complete with team members attached, when a new proof is created in Ziflow.
- Add proof comments and replies to Asana tasks to keep team members up to date on proof activity.
- Attach your original assets to Asana projects and tasks upon approval.
These integrations bring in functionality that will ensure design projects benefit from collaborative reviews. This means faster work approvals, and compliance requirements met, critical for any agencies and more regulated industries such as healthcare, financial services, cosumer goods, retail, and more.
Final Thoughts
Managing a design project isn’t a walk in the park, it takes thorough planning and setting up effective systems to make things work.
You’ll need a combination of a good project management plan, and effective project management software to meet ambitious deadlines.
The key point to remember; it’s all about collaboration and organization. Get all the facts, data, and design assets you need before you start. Even better if you choose software that helps you lock approvals so clients don’t expect you to redo work they already accepted.
Want to see how much difference the right tool can make in a design project? Try Ziflow completely FREE today.


Katie is a B2B copywriter and marketing strategist specializing in multi-channel content marketing campaigns for software and technology companies, including short and long-form written content, video, digital strategy and social media targeting.


